My Book Duo supports RAID Roaming.
Drives can be moved to another My Book Duo Enclosure.
The new enclosure MUST BE the same made and model of the old one due to Hardware RAID and encryption.
Need more help?
- Answer ID 4172: My Book: Drive Removed from Hardware RAID Enclosure Cannot be read by a Computer
- Answer ID 1837: WD External Drive Hardware Encryption Compatibility Matrix
Remove Drives From Old Enclosure

- Safe Eject the My Book Duo.
Need more help?
Answer ID 21880: Steps to Safe Eject and Remove an External USB Drive on Windows or macOS - Press the power button on the My Book Duo for 4 seconds to power it off.
- Remove the power cord.
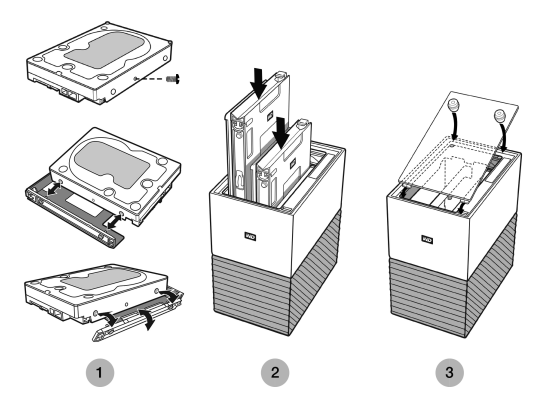
- Open the top lid at the rear using the drive access tool.
- Each drive is held in place by a tray with two screws.
- Gently press down and hold on the plastic latch with your index finger.
This will unlatch from the metal frame of the drive. - Grab the plastic tray with fingertips and pull gently.
- The tray and drive should easily lift upwards or slide out.
- Keep track of the drive order/position.
Each drive will need to be put into the new enclosure in the same order/position. - DO NOT remove the drive trays from the drives.

Critical:
DO NOT mix up the drives and slot order/position.
Drive #1 MUST go into Slot #1 of the new enclosure.
Drive #2 MUST go into Slot #2 of the new enclosure - Gently press down and hold on the plastic latch with your index finger.
Add Drive to New Enclosure
- Press the power button on the My Book Duo for 4 seconds to power it off.
- Ensure the power cord is disconnected.
- Open the top lid at the rear using the drive access tool.
- Put the drives into the in.
Make sure to keep the same order/position the drives came out of the old enclosure.

The tray should slide in with ease. Do NOT force it.
The side of the drive with the SATA and power connector must point down in the unit.
The side of the drive with the small serial number label must face up.
The latch must be on the side of the tray that is closest to the rear.The drive is inserted once the plastic latch connects or latches into the metal chassis of the unit.
- Put the top cover back on.
The end with the curved hinges goes in first.
Press down on the other side of the lid until it is flush with the top. - Connect the power cord and USB cable.
- Go to the Windows Explorer or macOS Finder to check access.
